With Pixar Fest at Disneyland, the Incredible Summer at Walt Disney World and The Incredibles 2 movie, we’re leaping for joy! To celebrate all things Incredibles happening in and outside of the Disney parks (and our overall love for the Parr family), we’ve hopped to making another sweet treat. And it’s Jack-Jack approved. We know there are so many exciting events happening at the parks and it’s not easy to hop to each experience. We’ve created our version of decorated cookies inspired by the Incredibles so you can have your own super experience at home.
The aroma of baked cookies will have tadpoles lined up and ready to decorate the Incredibles cookies! It sure had Tad and Lily getting creative in the kitchen — they had the idea to decorate a few of the Incredibles cookies with “Bam” and “Pow!” Whether you’re a huge Incredibles fan or are looking for a way to show dad how incredible he is on Father’s Day, these cookies are perfect for any occasion.
When we decided to decorate the Incredibles cookies, we knew decorating would be a task in itself and opted for ready-to-bake cookie dough. Our easy royal icing recipe makes these cookies toadally doable. Don’t worry, mommy frogs, you don’t have to have superpowers to decorate like a pro. We’ve made it oh-so-easy and fun!
Incredibles Cookie Decorating Tutorial
Follow these easy-peasy, step-by-step instructions for our incredible cookie decorating tutorial. For those of you who want to see the magic behind-the-scenes, watch our time-lapse tutorial of the Incredibles Cookies!
For the Incredibles cookies, you’ll need:

- Ready-to-bake sugar cookies
- 3 cups of powdered sugar
- Food coloring (yellow, red and black)
- Vanilla extract
- 11 tsp of water
- Toothpick
- 4 round decorating tips
- 4 Ziploc bags
First, prepare the royal icing by combining powdered sugar, water and vanilla extract in a large bowl and mix. Divide icing into three small bowls to make yellow, orange and black icing, leaving a tad bit of white icing in the bowl for the dot of the “i.” Make the yellow icing by adding two drops of yellow food coloring. One drop of black food coloring will do for the black icing.
Cut a small portion of the four Ziploc bags to fit the decorating tips. Pour each icing into separate bags and set aside.

Begin decorating by using the yellow icing to outline the dot of the “i.” Then outline and fill in the lower portion of the letter by using a toothpick to evenly distribute icing. Don’t forget the slight angle at the top!

Use the orange icing to add the outer shape of the logo on both sides of the letter and fill in.

Use the white icing to fill the middle dot of the “i”.
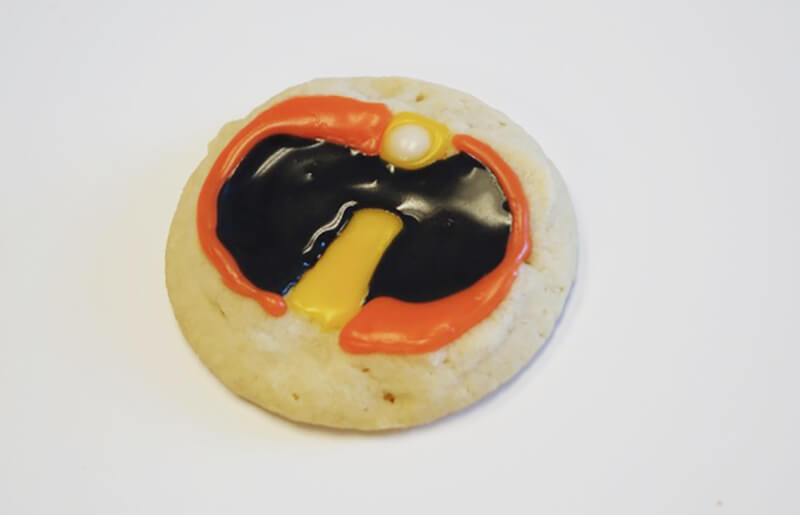
Finally, use the black icing to fill in the inner portion of the logo. The previously iced icing will be hardened so no need to worry about the black icing bleeding into other parts of the cookie. Repeat or decorate with your favorite Incredibles quote!
The Incredibles cookies are so delicious they’ll be flying out of the kitchen. Remember to share with your favorite superhero!
Related: Re-Create Epcot's Festival Fave Violet Lemonade
Toadally wicked, right? Do the Incredibles cookies put a hop in your step to create more? See more of our kid-friendly crafts on our Disney World Kids Planning Page. Hop back soon for more fun from the frog pond!